
验证码
验证码解决方案
传统web解决方法
后端生成验证码,并且将验证码存入session,前端发起登录请求,在UserNamePasswordAuthenticationFIlter之前添加一个校验验证码的过滤器,在验证用户名和密码之前校验验证码。
因为这个项目我实现的是前后端分离项目,存在前端每次请求sessoinId不一样的情况。故这个代码就省略了,可以参考后面前后端分离的代码,只不过是用Redis存储了我们校验码而已。
前后端分离解决方案
在这个方案中,省略掉Spring Security,Redis和MyBatis-plus相关代码,用户名和密码校验可以参考Spring Security(一):用户授权实战 。
kaptcha
引入依赖
1
2
3
4
5
6
7
8
9
10
11
12
13
14
15
16
17
18
19
20
21
22
23
24
25
26
27
28
29
30
31
32
33
34
35
36
37
38
39
40
41
42
43
44
45
46
47
48
49
50
51
52
53
54
55
56
57
58
59
60
61
62
63
64<dependencies>
<dependency>
<groupId>org.springframework.boot</groupId>
<artifactId>spring-boot-starter</artifactId>
</dependency>
<dependency>
<groupId>org.springframework.boot</groupId>
<artifactId>spring-boot-devtools</artifactId>
<scope>runtime</scope>
<optional>true</optional>
</dependency>
<dependency>
<groupId>org.projectlombok</groupId>
<artifactId>lombok</artifactId>
<optional>true</optional>
</dependency>
<dependency>
<groupId>org.springframework.boot</groupId>
<artifactId>spring-boot-starter-test</artifactId>
<scope>test</scope>
</dependency>
<dependency>
<groupId>org.springframework.boot</groupId>
<artifactId>spring-boot-starter-web</artifactId>
</dependency>
<dependency>
<groupId>com.baomidou</groupId>
<artifactId>mybatis-plus-boot-starter</artifactId>
<version>3.4.1</version>
</dependency>
<dependency>
<groupId>org.springframework.boot</groupId>
<artifactId>spring-boot-starter-security</artifactId>
</dependency>
<dependency>
<groupId>mysql</groupId>
<artifactId>mysql-connector-java</artifactId>
</dependency>
<!--Spring Data Redis为我们封装了Redis客户端的各种操作,简化使用-->
<dependency>
<groupId>org.springframework.boot</groupId>
<artifactId>spring-boot-starter-data-redis</artifactId>
</dependency>
<!-- redis工具类使用fastjson【序列化】 -->
<dependency>
<groupId>com.alibaba</groupId>
<artifactId>fastjson</artifactId>
<version>1.2.28</version>
</dependency>
<!-- jwt工具类用到的依赖 -->
<dependency>
<groupId>io.jsonwebtoken</groupId>
<artifactId>jjwt</artifactId>
<version>0.9.1</version>
</dependency>
<!-- 传统web开发使用的验证码-->
<dependency>
<groupId>com.github.penggle</groupId>
<artifactId>kaptcha</artifactId>
<version>2.3.2</version>
</dependency>
</dependencies>
添加验证码配置类和实体类
1
2
3
4
5
6
7
8
9
10
11
12
13
14
15
16
17
18
19
20
21
22
23
24
25
26
27
28
29
30
31
32
public class KaptchaConfig {
public Producer kaptcha() {
Properties properties = new Properties();
// 是否有边框
properties.setProperty(Constants.KAPTCHA_BORDER, "yes");
// 边框颜色
properties.setProperty(Constants.KAPTCHA_BORDER_COLOR, "192,192,192");
// 验证码图片的宽和高
properties.setProperty(Constants.KAPTCHA_IMAGE_WIDTH, "110");
properties.setProperty(Constants.KAPTCHA_IMAGE_HEIGHT, "40");
// 验证码颜色
properties.setProperty(Constants.KAPTCHA_TEXTPRODUCER_FONT_COLOR, "0,0,0");
// 验证码字体大小
properties.setProperty(Constants.KAPTCHA_TEXTPRODUCER_FONT_SIZE, "32");
// 验证码生成几个字符
properties.setProperty(Constants.KAPTCHA_TEXTPRODUCER_CHAR_LENGTH, "4");
// 验证码随机字符库
properties.setProperty(Constants.KAPTCHA_TEXTPRODUCER_CHAR_STRING, "0123456789ABCDEFGHIJKLMNOPQRSTUVWXYAZ");
// 验证码图片默认是有线条干扰的,我们设置成没有干扰
properties.setProperty(Constants.KAPTCHA_NOISE_IMPL, "com.google.code.kaptcha.impl.NoNoise");
Config config = new Config(properties);
DefaultKaptcha defaultKaptcha = new DefaultKaptcha();
defaultKaptcha.setConfig(config);
return defaultKaptcha;
}
}1
2
3
4
5
6
7
8
9
10
11
12
13
14
15
16
17
18
19
20
21
22
23
24
25
26
27public class VrCode implements Serializable {
private static final long serialVersionUID = 6333481564965869971L;
private String code; //验证字符
private LocalDateTime expireTime; //过期时间
public VrCode(String code, int expireTime) {
this.code = code;
//返回指定的过期时间
this.expireTime = LocalDateTime.now().plusSeconds(expireTime);
}
public VrCode(String code) {
//默认验证码 60秒后过期
this(code, 60);
}
//是否过期
public boolean isExpired() {
return this.expireTime.isBefore(LocalDateTime.now());
}
public String getCode() {
return code;
}
}Controller我们这里是返回前端一个图片的Base64编码,在前端可以指定前缀加上编码放入
img标签的src属性内显示图片。1
2
3
4
5
6
7
8
9
10
11
12
13
14
15
16
17
18
19
20
21
22
23
24
25
26
27
28
29
30
31
32
33
34
35
36
37
38
39
40
41
42
43
44
public BaseResponse getVrImg(HttpServletRequest request, HttpServletResponse response) throws IOException {
//1.创建验证码文本
String capText = producer.createText();
//2.创建验证码图片
BufferedImage bufferedImage = producer.createImage(capText);
//3.将验证码文本放进 redis 中
VrCode code = new VrCode(capText);
String uuid = UUID.randomUUID().toString().replaceAll("-", "");
String key = "CAPTCHA_CODE_KEY:" + uuid;
redisCache.setCacheObject(key,code,60,TimeUnit.SECONDS);
String png = encodeBufferedImageToBase64(bufferedImage, "png");
Map<String, Object> map = new HashMap<>();
map.put("img", png);
map.put("uuid", uuid);
return BaseResponse.success(map);
}
public String encodeBufferedImageToBase64(BufferedImage image, String type) {
// 创建一个用于输出的 ByteArrayOutputStream
ByteArrayOutputStream baos = new ByteArrayOutputStream();
try {
// 将 BufferedImage 写入 ByteArrayOutputStream
ImageIO.write(image, type, baos);
// 刷新流
baos.flush();
// 将字节数据转换为字节数组
byte[] imageBytes = baos.toByteArray();
// 使用 Base64 编码字节数组
String base64String = Base64.getEncoder().encodeToString(imageBytes);
// 关闭 ByteArrayOutputStream
baos.close();
// 返回 Base64 编码的字符串
return base64String;
} catch (IOException e) {
e.printStackTrace();
return null;
}
}
Filter这一步需要在我们的
UsernamePasswordAuthenticationFilter之前。需要在Spring Security配置类中配置一下过滤器顺序。1
2
3
4
5
6
7
8
9
10
11
12
13
14
15
16
17
18
19
20
21
22
23
24
25
26
27
28
29
30
31
32
33
34
35
36
37
38
39
40
41
42
public class VrcodeFilter extends OncePerRequestFilter {
AuthenticationEntryPointImpl authenticationEntryPoint;
RedisCache redisCache;
protected void doFilterInternal(HttpServletRequest request, HttpServletResponse response, FilterChain filterChain) throws ServletException, IOException {
if(request.getMethod().equals("POST")){
try {
validate(request);
} catch (Exception e) {
authenticationEntryPoint.commence(request,response, (AuthenticationException) e);
}
}
filterChain.doFilter(request,response);
}
private void validate(HttpServletRequest request) throws Exception {
String req_vr_code = request.getParameter("vrcode");
req_vr_code = req_vr_code.trim();
//获取redis中的正确验证码
String tr_code = redisCache.getCacheObject("CAPTCHA_CODE_KEY:" + request.getParameter("uuid"));
//不管是否成功我们都需要清空redis
if(tr_code != null){
redisCache.deleteObject("CAPTCHA_CODE_KEY:" + request.getParameter("uuid"));
}
if(req_vr_code == null){
throw new CaptchaNotMatchException("请刷新验证码");
}
//校验
if(StringUtils.isEmpty(req_vr_code)){
throw new CaptchaNotMatchException("验证码不能为空");
}
}
}前端代码:
这里是一个前后端分离的项目,需要配置跨域,这里可以参考跨域问题
1
2
3
4
5
6
7
8
9
10
11
12
13
14
15
16
17
18
19
20
21
22
23
24
25
26
27
28
29
30
31
32
33
34
35
36
37
38
39
40
41
42
43
44
45
46
47
48
49
50
51
52
53
54
55
56
57
58
59
60
61
62
63
64
65
66
67
68
69
70
71
72
73
74
75
76
77
78
79
80
81
82
83
84
85
86
87
88
89
90
91
92
93
94
95
96
97
98
99
100
101
102
103
104
105
106
107
108
109
110
111
112
113
114<template>
<ContentCard>
<div class="row">
<div class="col"></div>
<div class="col">
<form @submit.prevent="login">
<div class="mb-3">
<label for="exampleInputEmail1" class="form-label">用户名</label>
<input
type="text"
class="form-control"
id="exampleInputEmail1"
aria-describedby="emailHelp"
v-model="username"
/>
</div>
<div class="mb-3">
<label for="exampleInputPassword1" class="form-label">密码</label>
<input
type="password"
class="form-control"
id="exampleInputPassword1"
v-model="password"
/>
</div>
<div class="mb-3">
<label for="exampleInputPassword1" class="form-label">验证码</label>
<br />
<div class="row">
<div class="col-8">
<input
v-model="vr_code"
type="password"
class="form-control"
id="exampleInputPassword1"
/>
</div>
<div class="col-4">
<img class="verify-img" :src="vrcode_img" @click="get_img" />
</div>
</div>
</div>
<button class="btn btn-primary" type="submit">登录</button>
</form>
</div>
<div class="col"></div>
</div>
</ContentCard>
</template>
<script>
import { ref } from "vue";
import $ from "jquery";
import ContentCard from "@/components/ContentCard.vue";
export default {
name: "LoginView",
components: {
ContentCard,
},
setup() {
let username = ref("");
let password = ref("");
let vr_code = ref("");
let vrcode_img = ref("");
let uuid = ref("");
let login = () => {
console.log(username);
$.ajax({
url: "http://127.0.0.1:8081/login",
type: "post",
data: {
username: username.value,
password: password.value,
vrcode: vr_code.value,
uuid: uuid,
},
success(resp) {
console.log(resp);
},
});
};
let get_img = () => {
$.ajax({
url: "http://127.0.0.1:8081/vrcode/img",
type: "get",
success(resp) {
vrcode_img.value = "data:image/png;base64," + resp.data.img;
uuid.value = resp.data.uuid;
},
});
};
get_img();
return {
username,
password,
vr_code,
login,
vrcode_img,
get_img,
};
},
};
</script>
<style scoped>
.verify-img {
width: 8vw;
height: 4vh;
border: 1px solid black;
}
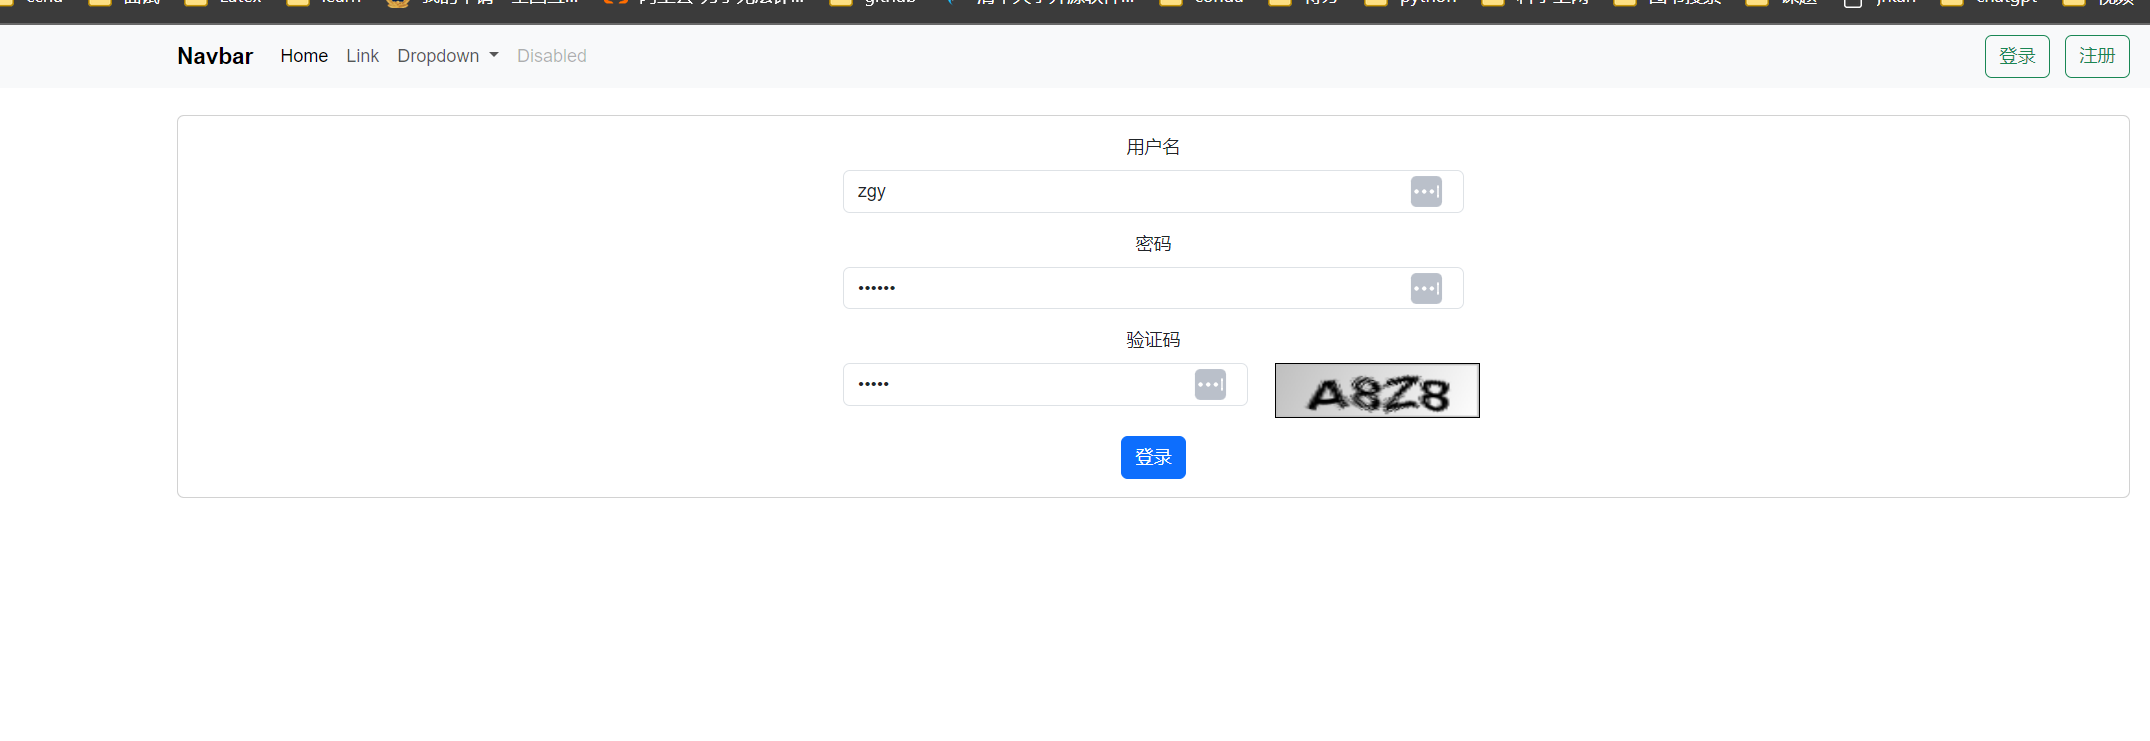
</style>效果:

easy-captcha
导入依赖
1
2
3
4
5<dependency>
<groupId>com.github.whvcse</groupId>
<artifactId>easy-captcha</artifactId>
<version>1.6.2</version>
</dependency>更改生成验证码方法
1
2
3
4
5
6
7
8
9
10
11
12
13
14
15
16
17
18
19
20
21
22
23
24
/**
* 生成验证码
* @param response
* @return: com.mashibing.springsecurity_example.common.ResponseResult
*/
public ResponseResult getCode(HttpServletResponse response){
SpecCaptcha specCaptcha = new SpecCaptcha(130, 48, 4);
//生成验证码,及验证码唯一标识
String uuid = UUID.randomUUID().toString().replaceAll("-", "");
String key = Constants.CAPTCHA_CODE_KEY + uuid;
String code = specCaptcha.text().toLowerCase();
//保存到redis
redisCache.setCacheObject(key,code,1000, TimeUnit.SECONDS);
//创建map
HashMap<String,Object> map = new HashMap<>();
map.put("uuid",uuid);
map.put("img",specCaptcha.toBase64());
return new ResponseResult(200,"验证码获取成功",map);
}
此文章版权归waar299所有,如有转载,请注明来自原作者!
评论